
How to draw in isometric projection in Adobe Illustrator
16 minute readIn this tutorial, we’ll be looking at several different techniques for drawing in an isometric perspective in Adobe Illustrator, including:
What is isometric art?
An isometric drawing is a perspective technique to represent 3D objects in a 2D space. You use parallel grid lines to create art that shows the top, left and right sides of objects.
Setting up an isometric grid in Adobe Illustrator
An isometric grid is made up of equilateral triangles with 60° angles. Each line in the grid is at 30°, 60° and 120° angles. When you draw in at these angles, it gives the illusion of three dimensions.
Adobe Stock offers Free Isometric Grid Templates though be mindful they’re not all vector, so scaling could be an issue.
But if you want to make it for yourself then read on…

To create an equilateral triangle in Illustrator, you can use the Polygon tool found in the Advanced Toolbar (Window > Toolbars > Advanced) stacked under the Rectangle tool. Hold down on the Rectangle tool to open the stacked menu and move your cursor down to the Polygon tool and release. Then click in an empty space of your artboard to bring up the dialog window where you can enter a polygon with 3 sides and a distance of 50px. With this one triangle, we can hold the Shift key to rotate it through 90°.

Now we need to duplicate the triangle and rotate it to snap to the existing triangle. I will be using the Orient Transform tool from Astute Graphics to do this quickly and precisely. The Orient and Transform tool is a part of the SubScribe plugin and can be found stacked under the Orient tool. Once the triangle is selected and the tool is activated, you need to mark on the existing triangle the points you want as a reference. The tool is smart enough to snap to your anchor points and highlight these with a red circle annotation. Select the inner point and then the outer corner point.
Once you have marked up the shape, the Orient Transform tool will then replicate it according to the reference points when you next click-and-drag the tool. Starting at the inner point of the triangle, click-and-drag out to the opposite outer corner, and you will see the triangle shape being previewed. The tool will automatically snap to the points — ensuring precision — and holding down the Alt/Option key will duplicate the triangle (see the image below for the change in the cursor to show duplication). Release to confirm the new triangle shape.
This process needs to be repeated until we make it back round to the original. The easiest way to do that is to use the Command/Ctrl + D keypress to duplicate that action.

You have made your first isometric projection grid consisting of 6 triangles rotating at 30° degrees. The next stage is to repeat this shape so that it’s joined exactly at the bottom right edge. To do this we will ensure Smart Guides are enabled (View > Smart Guides or Command/Ctrl + U). Select all the triangles and click-and-drag while holding Alt/Option to duplicate it, and snap to the bottom right edge.
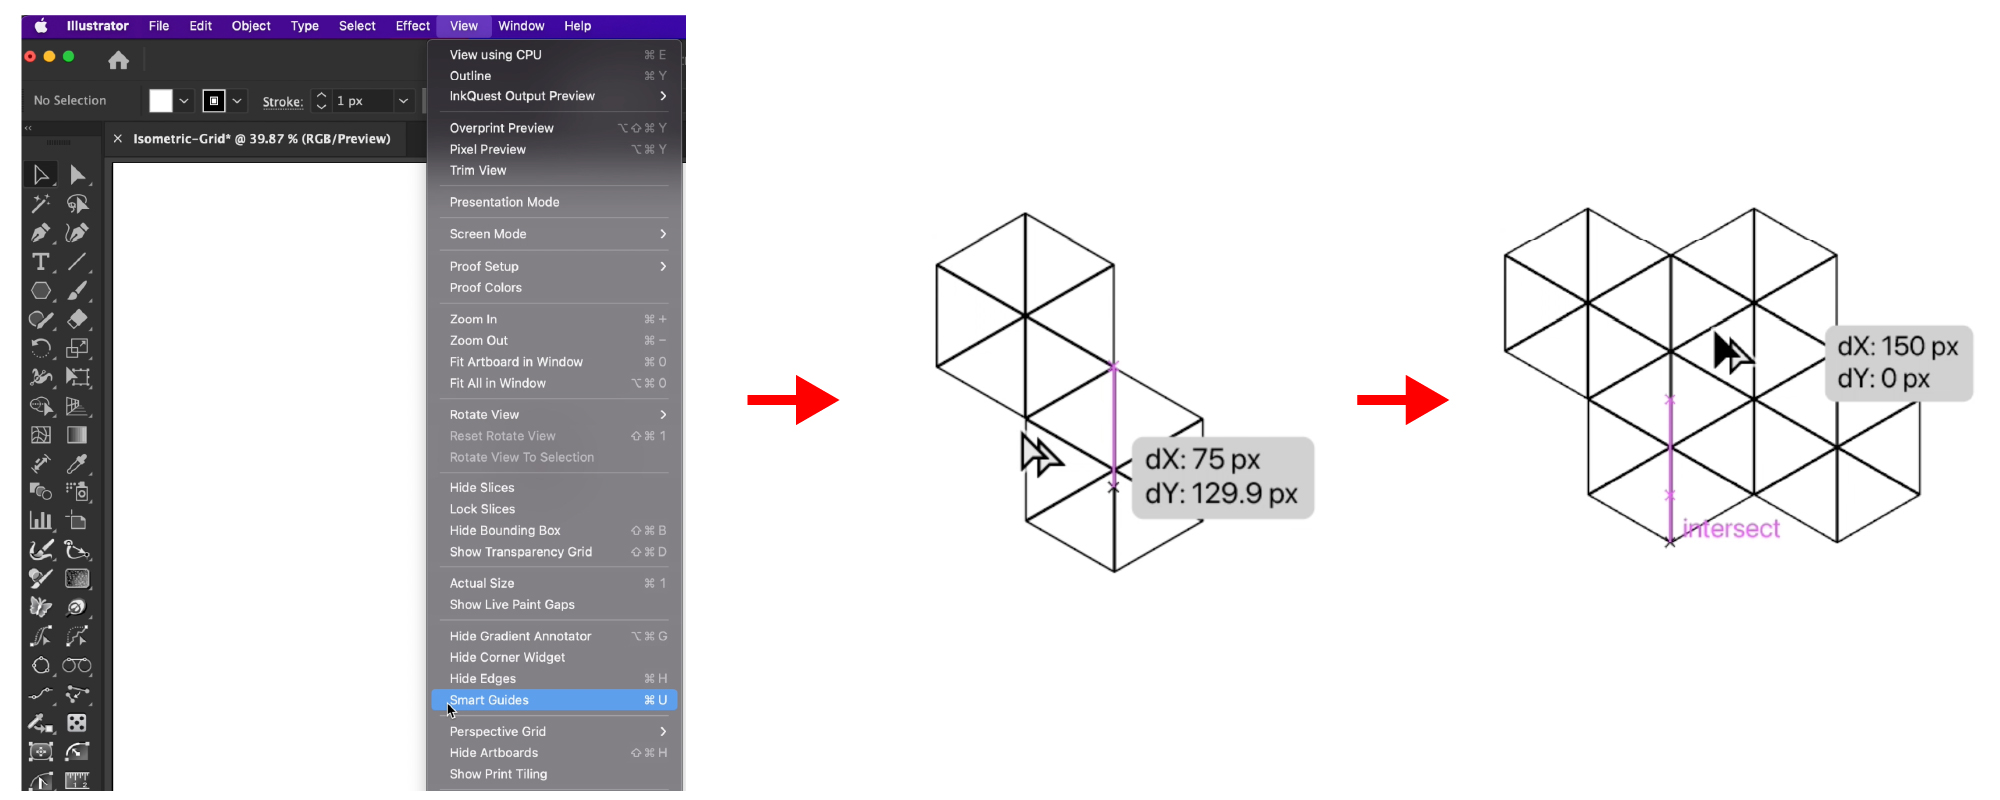
Repeat these two shapes across the whole artboard. Selecting all the objects and using the Alt/Option + Shift key, you can drag and snap to the right side. Command/Ctrl + D will then duplicate this action, and you can quickly cover the whole top of your artboard.
Select everything and repeat this process underneath, ensuring everything is snapping.

You now have a full isometric grid that is fully scalable if you want to adjust the size of your grid. To finally tidy up this grid and turn it into guides, we recommend opening the Pathfinder panel and using the Outline button to remove the duplicate paths lying directly on top of one another. Then with everything still selected, you can use either the menu item View > Guides > Make Guides or the keypress Command/Ctrl + 5 to convert these paths into guides.

How to draw on an isometric grid in Adobe Illustrator
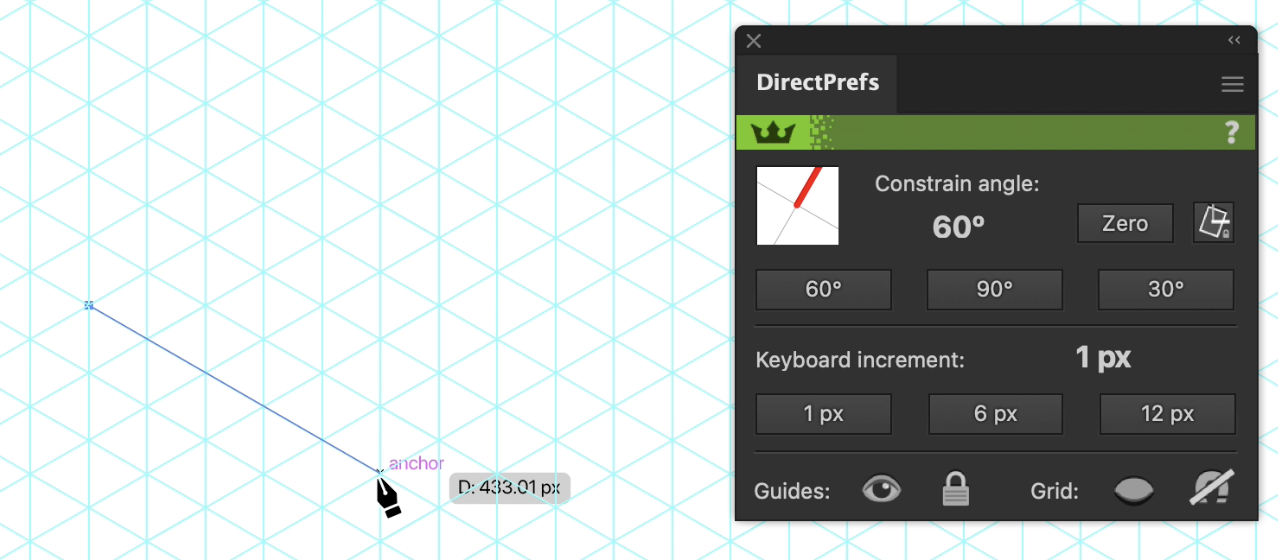
When you have your isometric grid all set up in Adobe Illustrator and you are ready to start drawing in an isometric projection, we recommend using the FREE plugin from Astute Graphics called DirectPrefs. This plugin adds a simple panel that gives you quick access to the constrain angle of your document, the nudge increment values and also has the ability to hide/lock your guides and grids.
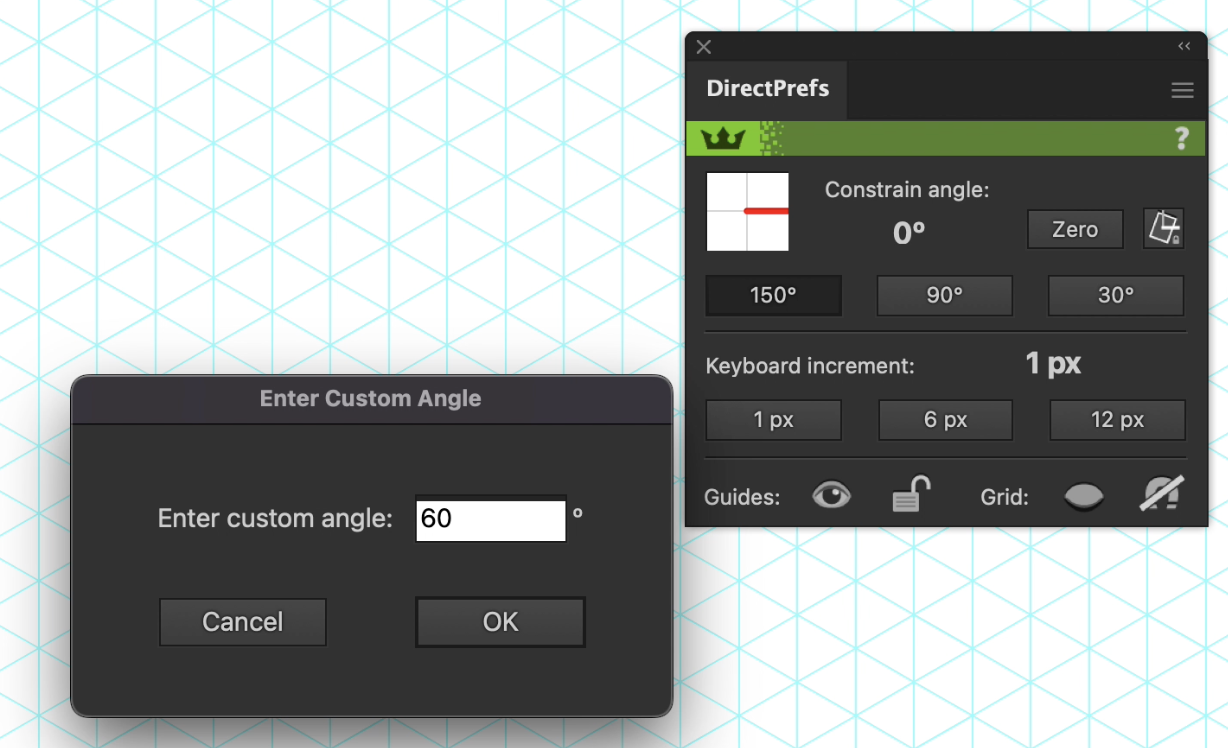
By default, the panel is set up with the constrain angle buttons set to 30°, 90° and 150°. To change these to work with your isometric drawing, all you need to do is hold the Alt/Option key when clicking on the button to show the dialog window where you can change it. We have changed the 150° to 60°. Now giving us quick access to switch between 30°, 60° and 90° quickly.

We can also use the DirectPrefs panel to quickly hide/show and lock/unlock our Isometric guides created in the previous section.

Now when you start to draw with the Pen tool — or the InkScribe pen tool from Astute Graphics — holding the Shift key will constrain the angle to the value you select in the DirectPrefs panel, rather than the default 0°, 45° and 90° degree angles. Which means with the combination of Smart Guides and this you can quickly start to draw in Adobe Illustrator snapping to your isometric grid.
How to set up isometric actions in Adobe Illustrator
If you want to be able to press and button and quickly convert your 2D flat shape into isometric shape, it is possible!
Adobe Illustrator has something called actions, which means you can record yourself doing something once, and then replay it again and again onto other objects.
You may have seen or heard about something called Isomeric SSR, but what is it? It’s the mathematical equation to convert a flat shape into a 3D shape by Scaling, Shearing and then Rotating (SSR). We’re going to show you how to record the actions of scaling, shearing and then rotating one square, which means that in the future all you have to do is press Play and any shape will become isometric.
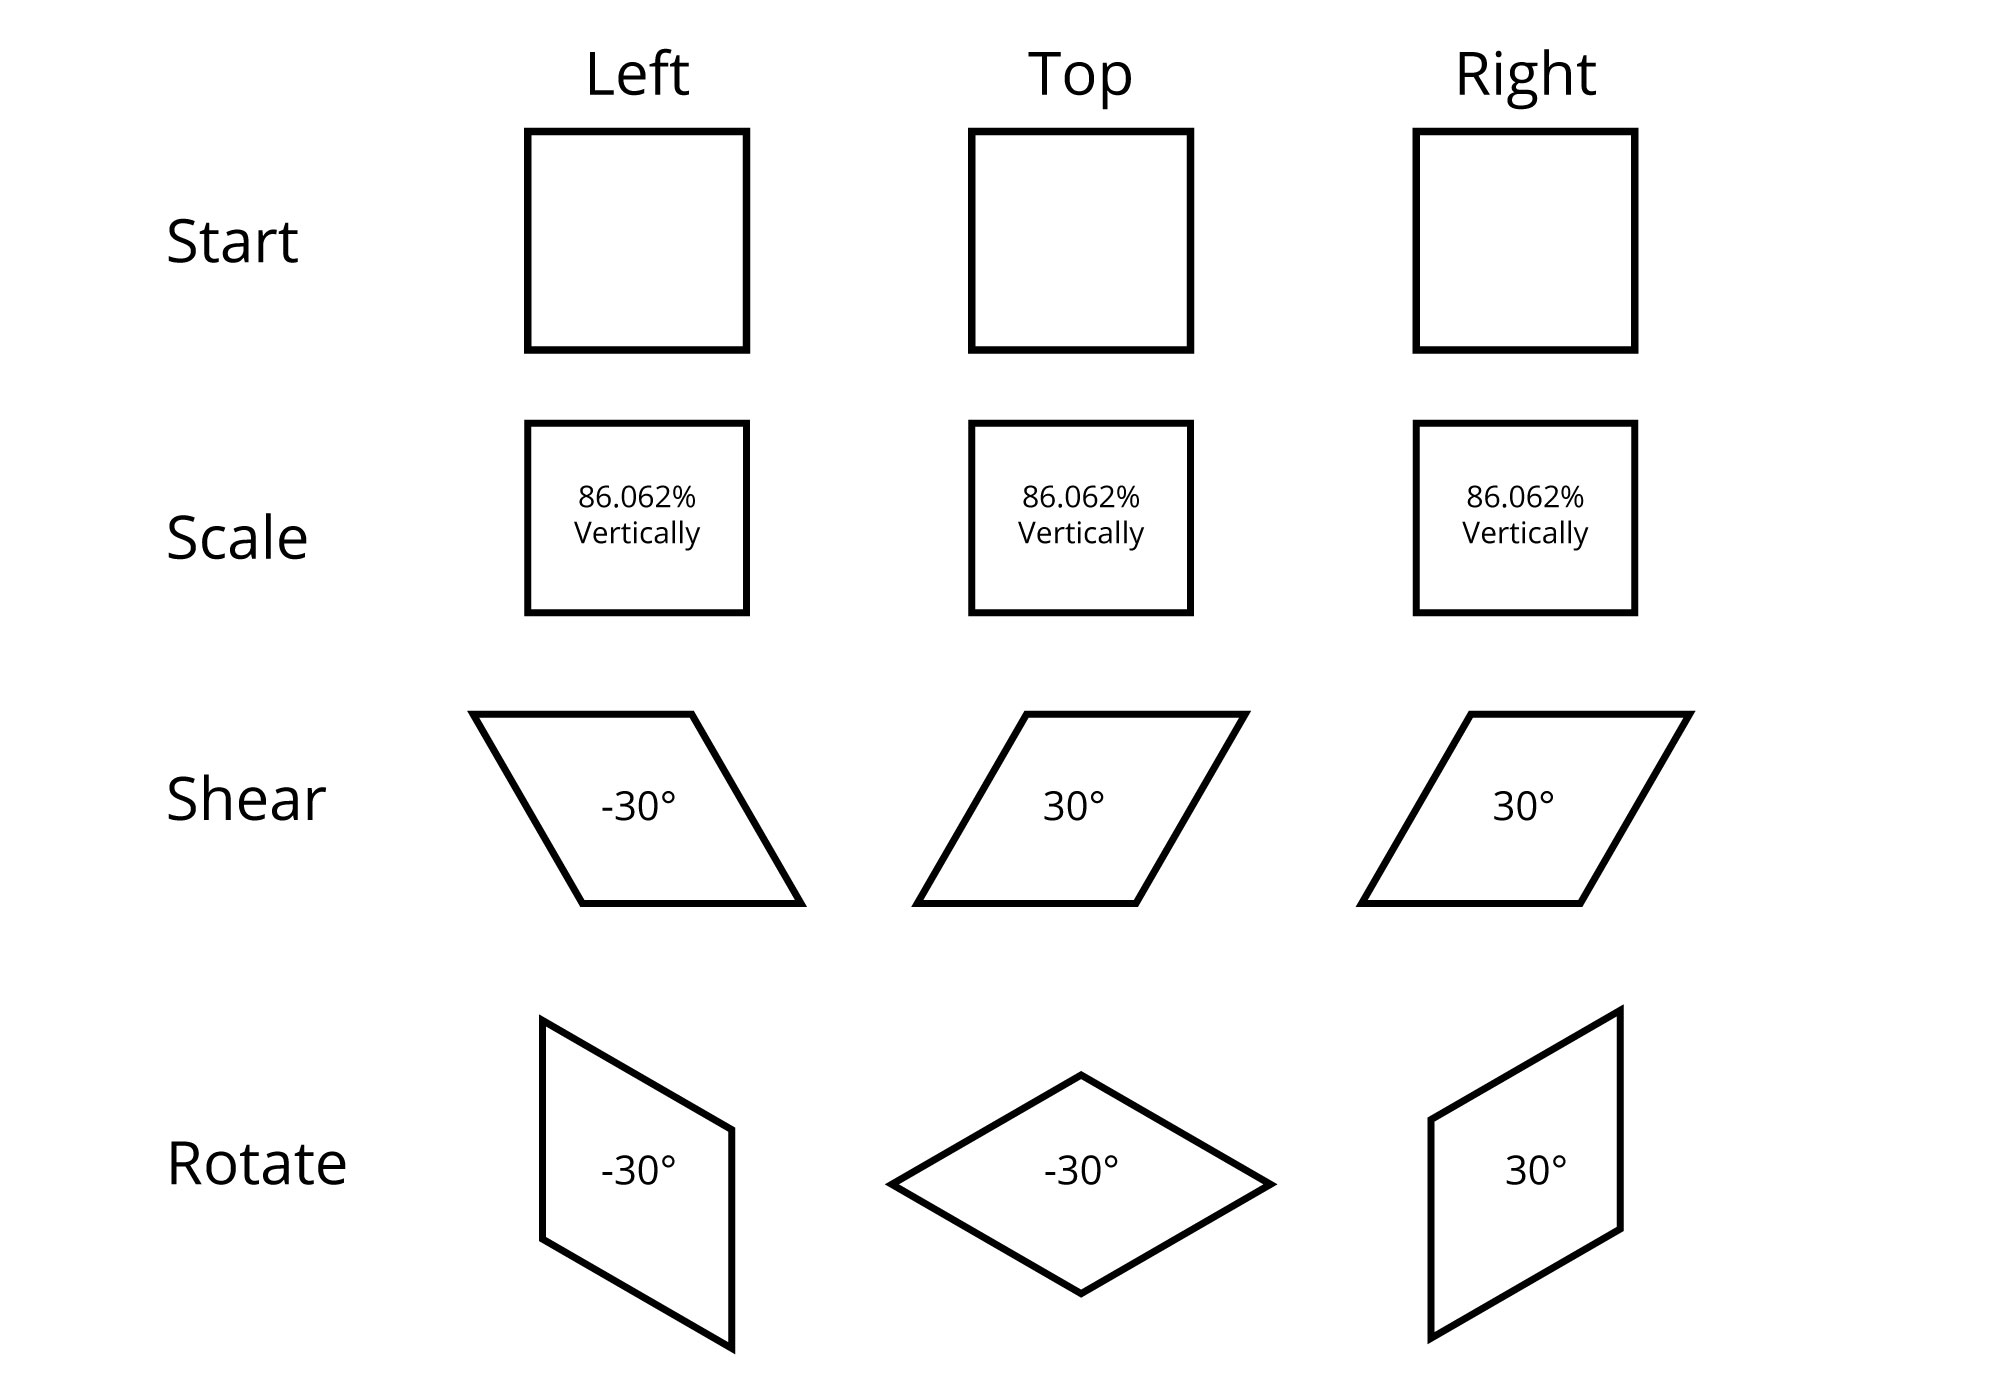
Isometric projection has a top, left and right. To convert your object into a top, left or right it needs a slightly different equation, and so we will have 3 actions in total.
Find the Actions panel under Window > Actions. If this is something you’ve not used before in Adobe Illustrator, you’ll notice that it comes with several inbuilt default actions. They are all in a folder called “Default Actions”, which stands to reason.
You can use the toggle icon to collapse that folder. We are going to click on the Folder icon and make a new folder and call it Isometrics.

Draw a square out on your artboard, and keep it selected.
Note: If your isometric guides are distracting, remember you can use the DirectPrefs panel to quickly hide them.
Press the Plus icon in the Actions panel, which brings up a dialog where we will name it “Top” and ensure it’s in the Isometrics Set.
Press Record.
Everything you now do will be recorded and listed out in the Actions panel. If you go wrong, you can stop the recording.
When you start recording, complete the following:
Right-click (on the artboard) > Transform > Scale... Enter the value: Non-Uniform 100% Horizontally + 86.062% Vertically.
(You should see Scale now showing in the Actions panel)Right-click > Transform > Shear... Enter the following: Horizontal + Angle 30°.
Right-click > Transform > Rotate… Enter the following: -30°.
Press the Stop Button in the Actions panel.

That may have seemed awkward but trust me, making the effort to do this once will save you so much time in the future. What you’ve just done is to record the process of making something isometrically correct from the top perspective. So if you were to draw a second square and select the Top action you’ve just created and press Play. Magic will happen!
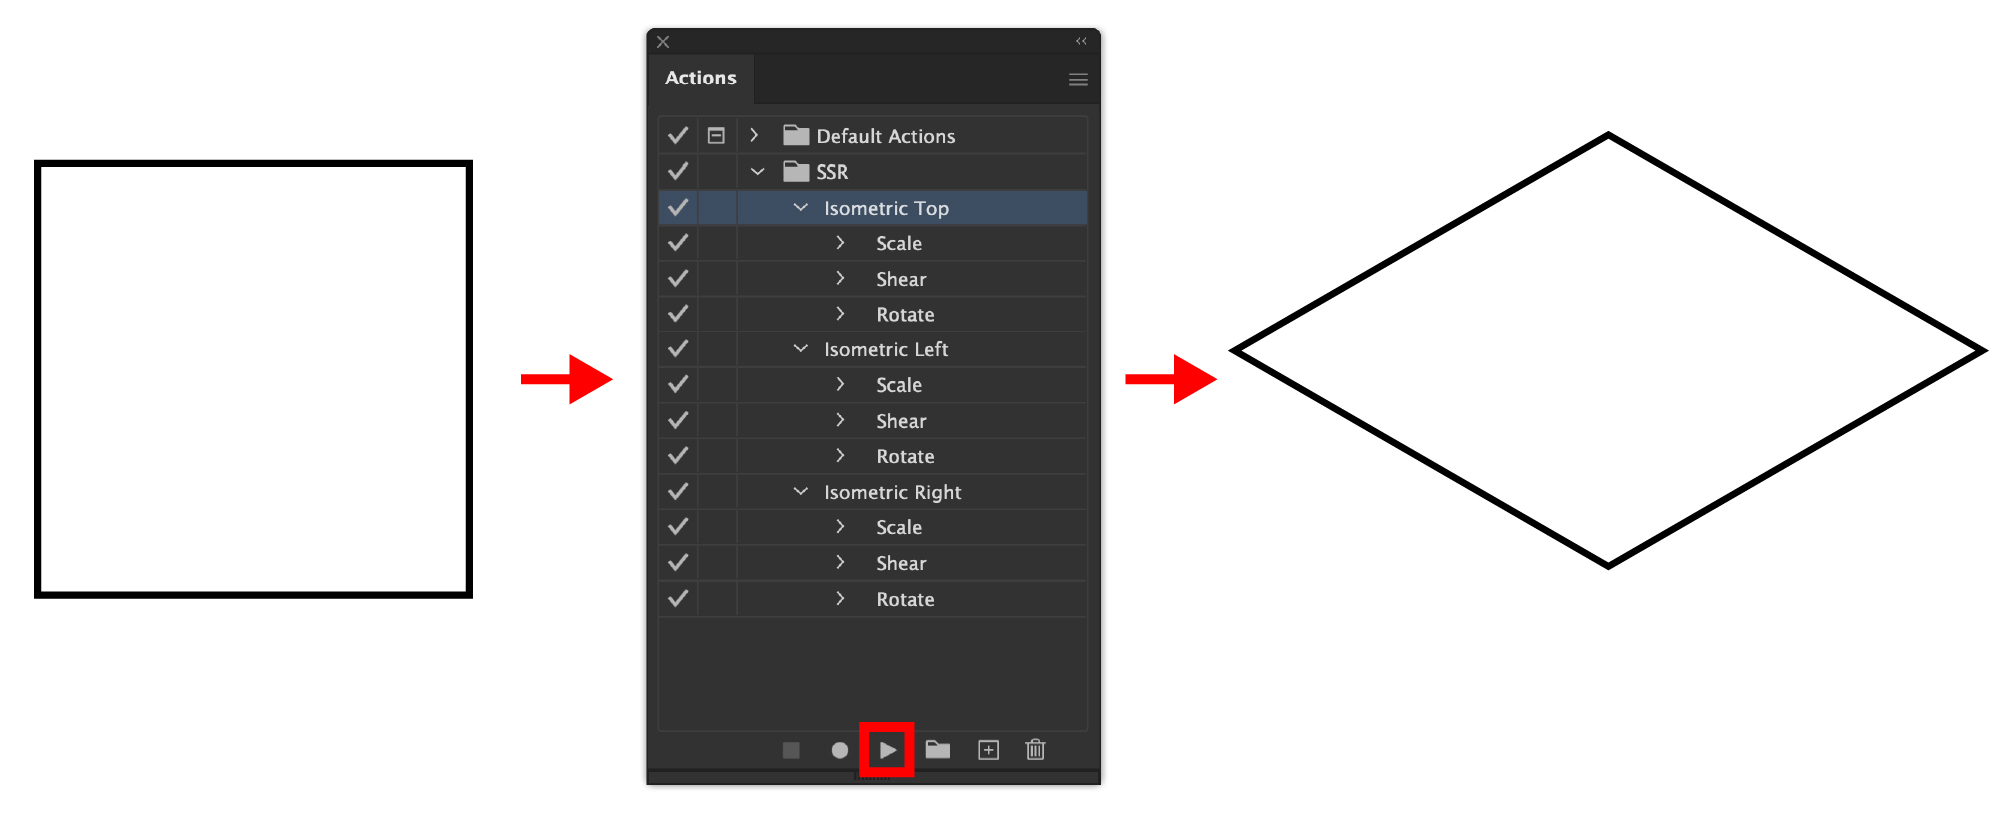
Now we just need to create 2 more actions for the Left and Right perspectives.
Left Perspective Isometric Actions:
Press the Create New Action button and name it Left.
Right-click > Transform > Scale… = Non-Uniform 100% Horizontally + 86.062% Vertically
Right-click > Transform > Shear… = Horizontal + Angle -30°
Right-click > Transform > Rotate… = -30°
Press Stop.
Right Perspective Isometric Actions:
Press the Create New Action button and name it Right.
Right-click > Transform > Scale… = Non-Uniform 100% Horizontally + 86.062% Vertically
Right-click > Transform > Shear… = Horizontal + Angle 30°
Right-click > Transform > Rotate… = 30°
Press Stop.
You’ve now made the three isometric actions that will be saved in your Adobe Illustrator so you can resume again and again in all your isometric projects.
How to change shapes to be in an isometric projection in Adobe Illustrator
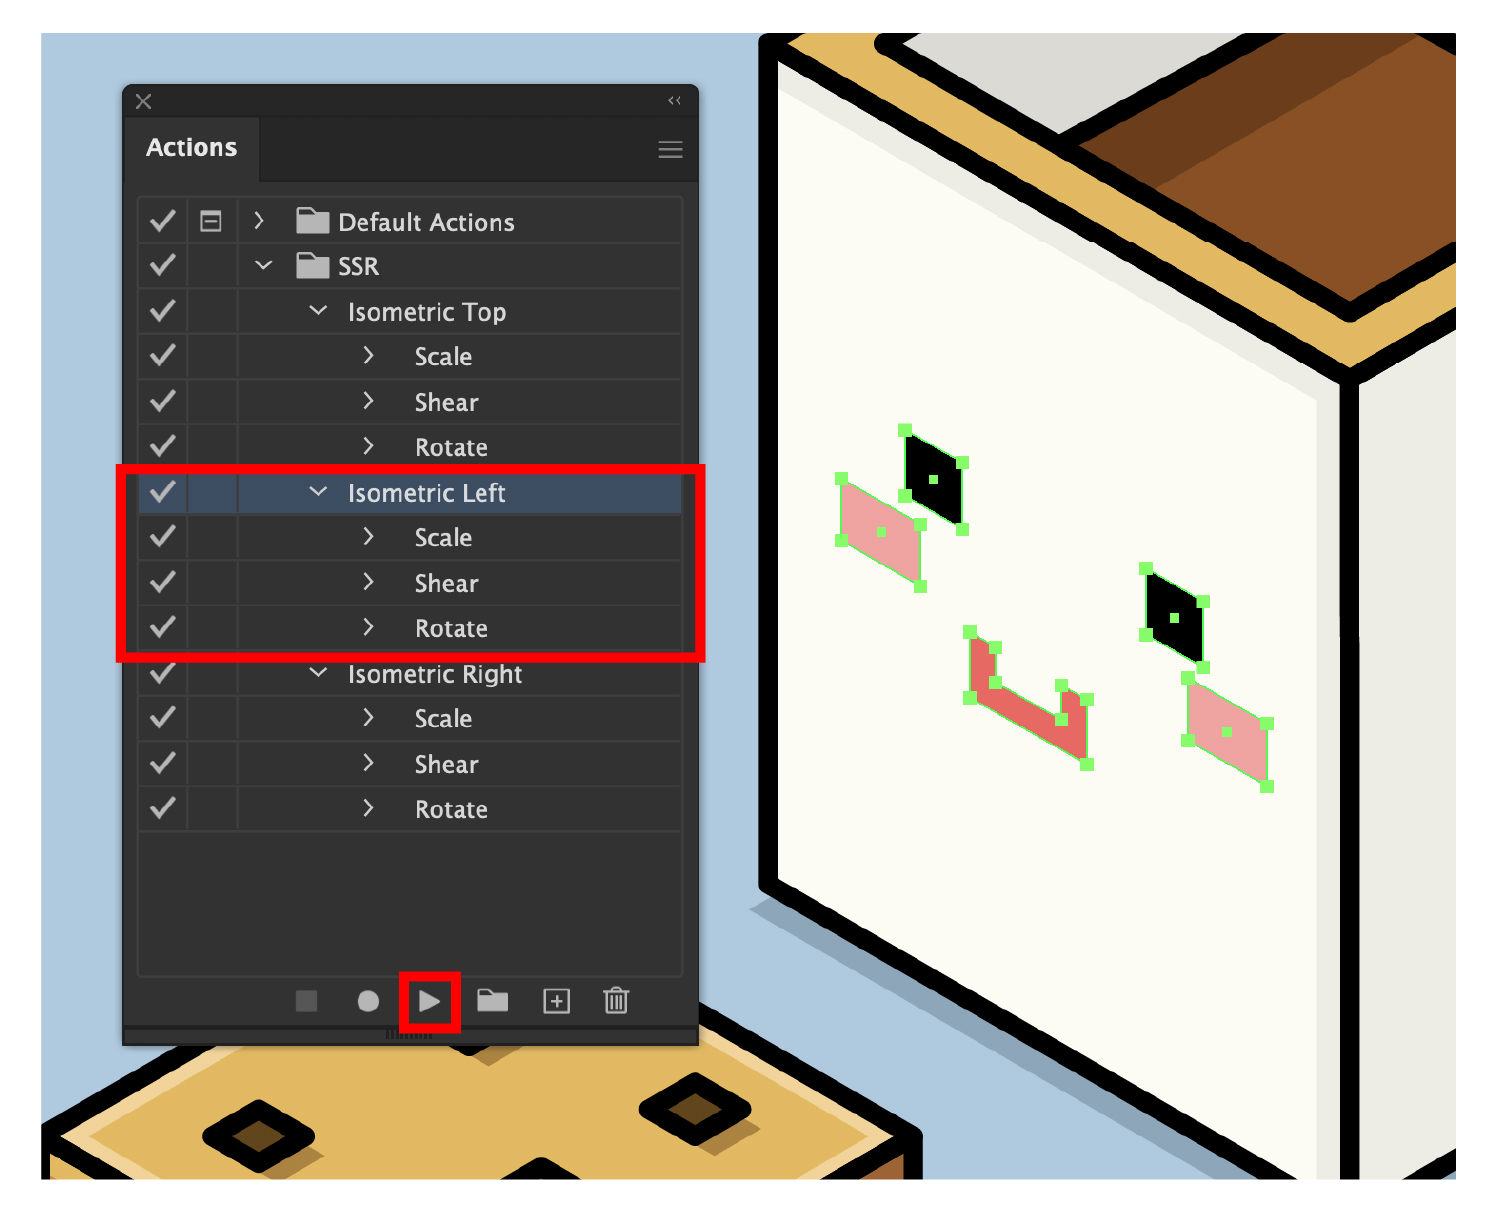
To quickly and easily convert your art shapes to be in an isometric projection in Adobe Illustrator, we highly recommend creating your own isometric actions (as listed above). This allows you to make and select a shape or group of shapes and press the Play button in the Actions panel to convert the artwork instantly.
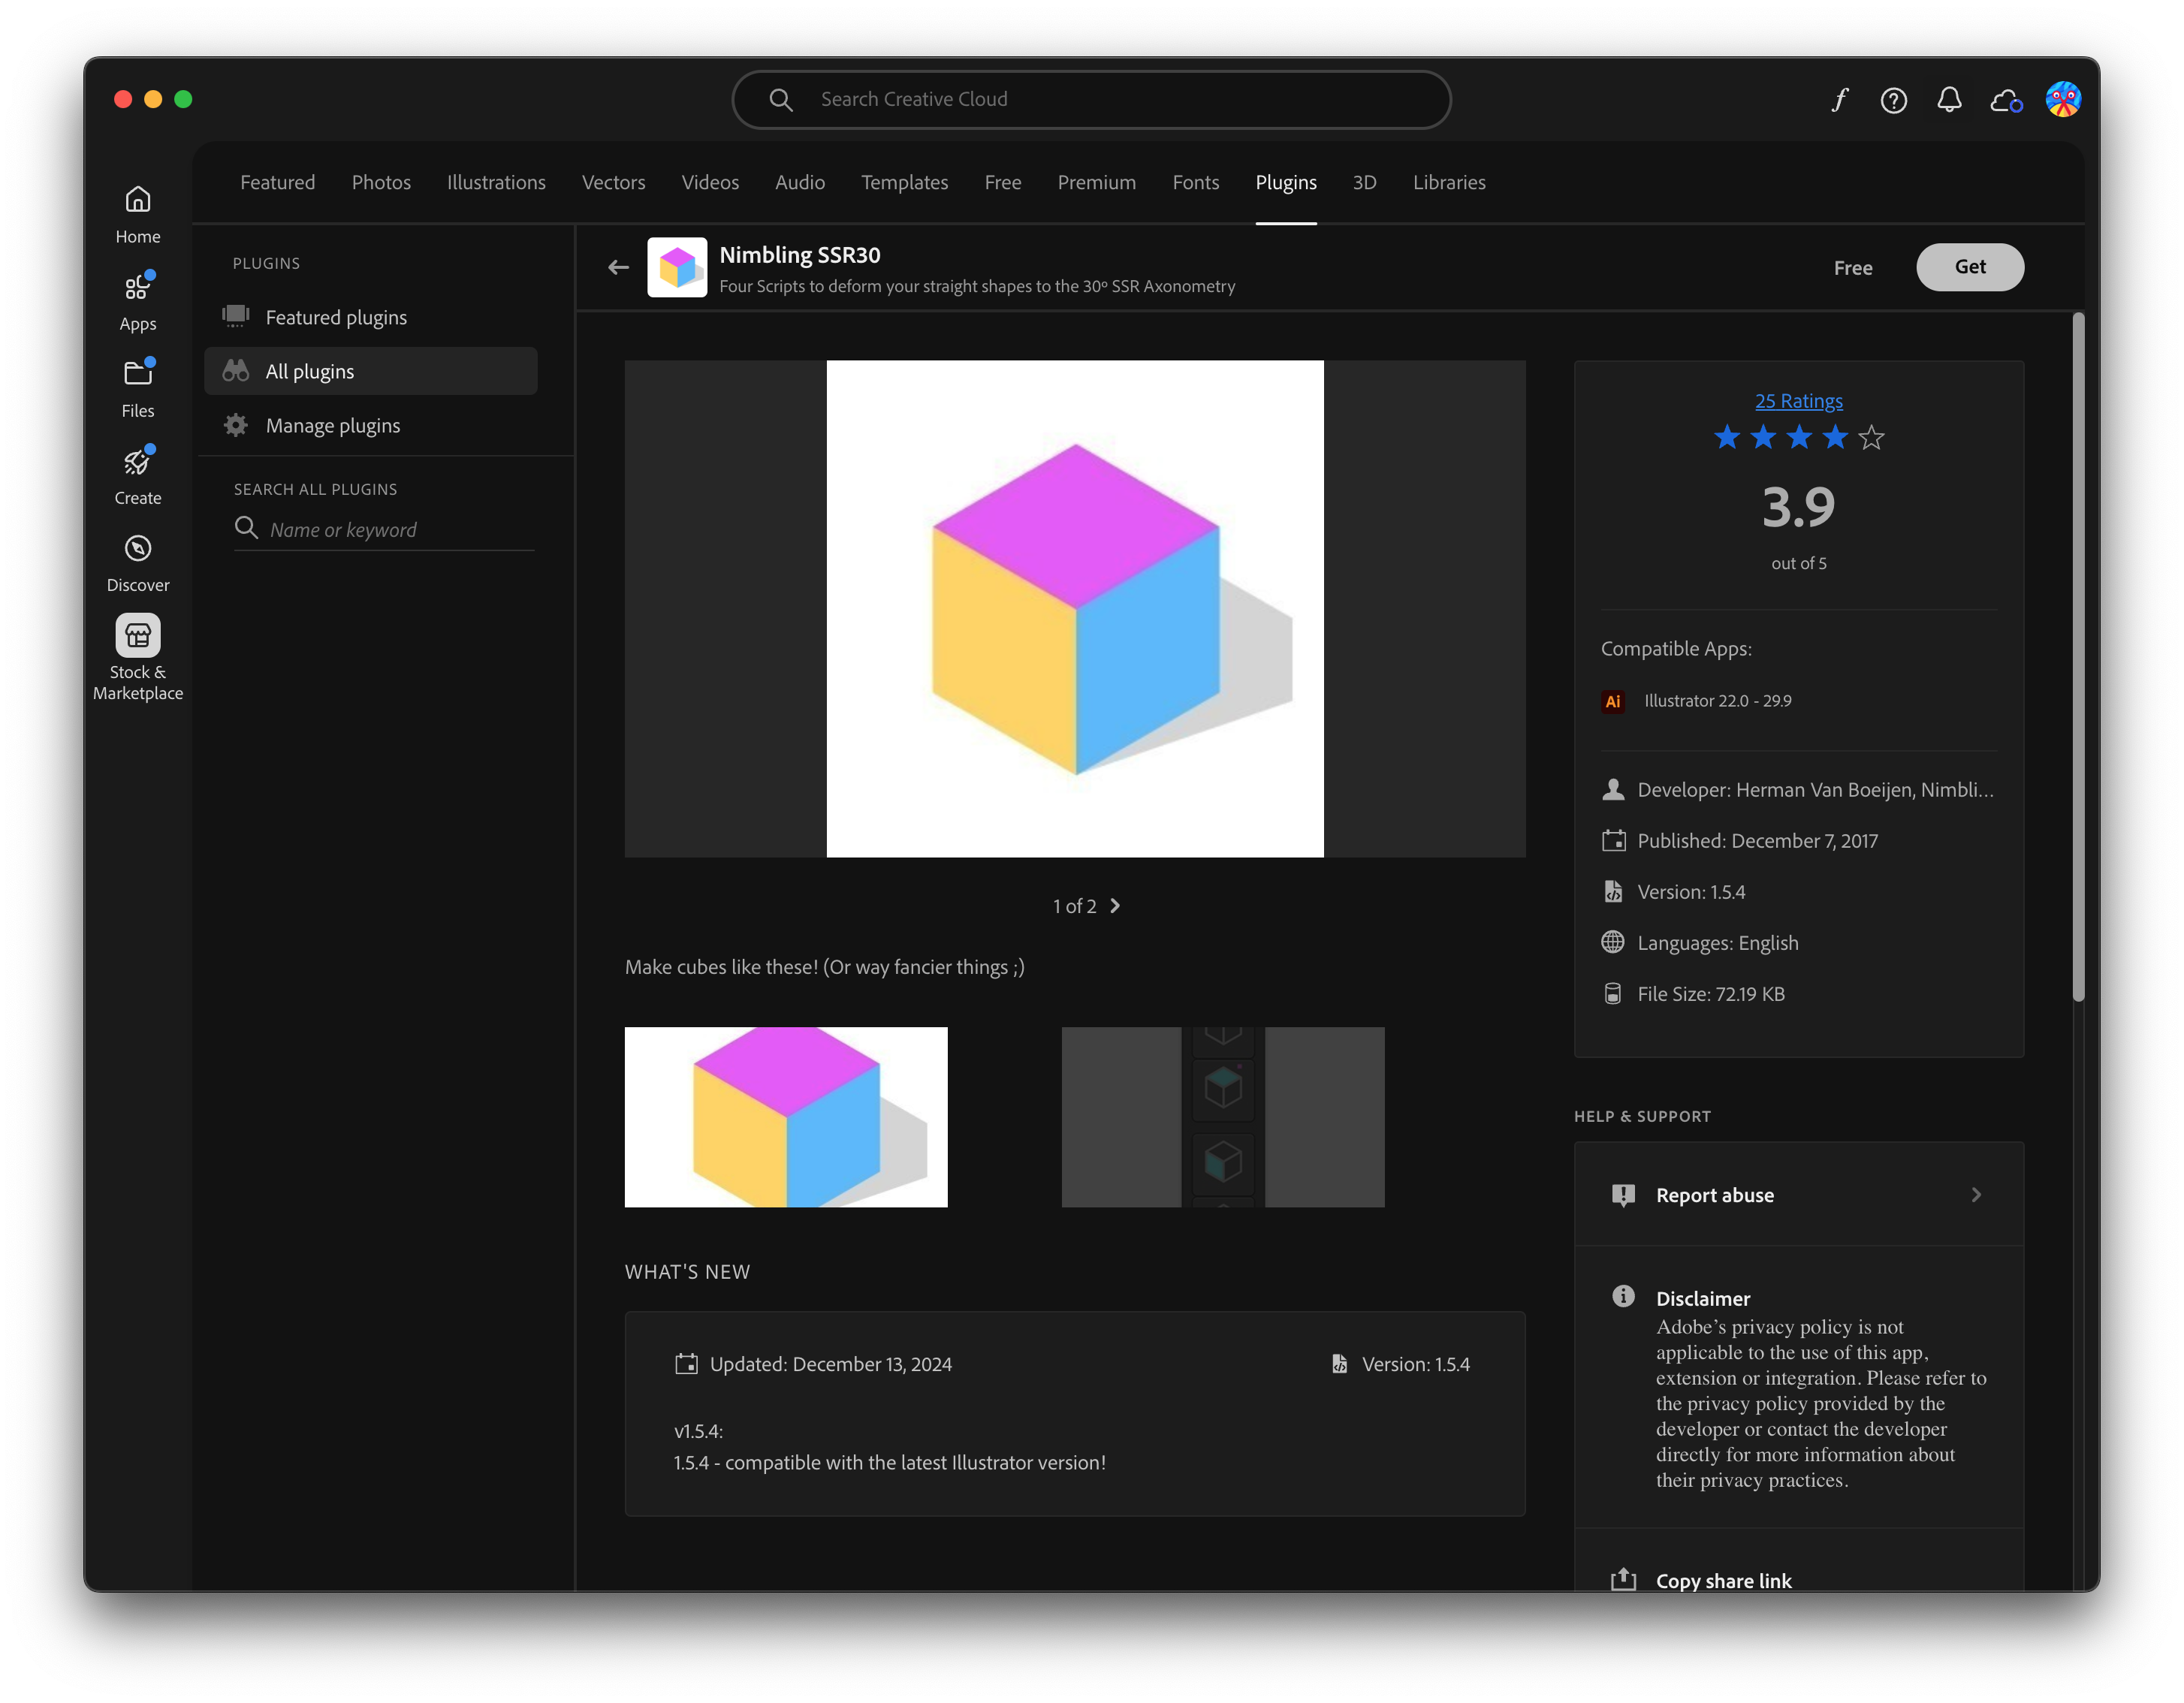
If you are not afraid of plugins and extensions, then maybe you could try the Nimbling 30 SSR Extension from the Adobe Exchange. Self-described as: “A rudimentary panel that allows you to quickly deform your shapes in the 30º Axonometry (Sometimes falsely called isometry).”
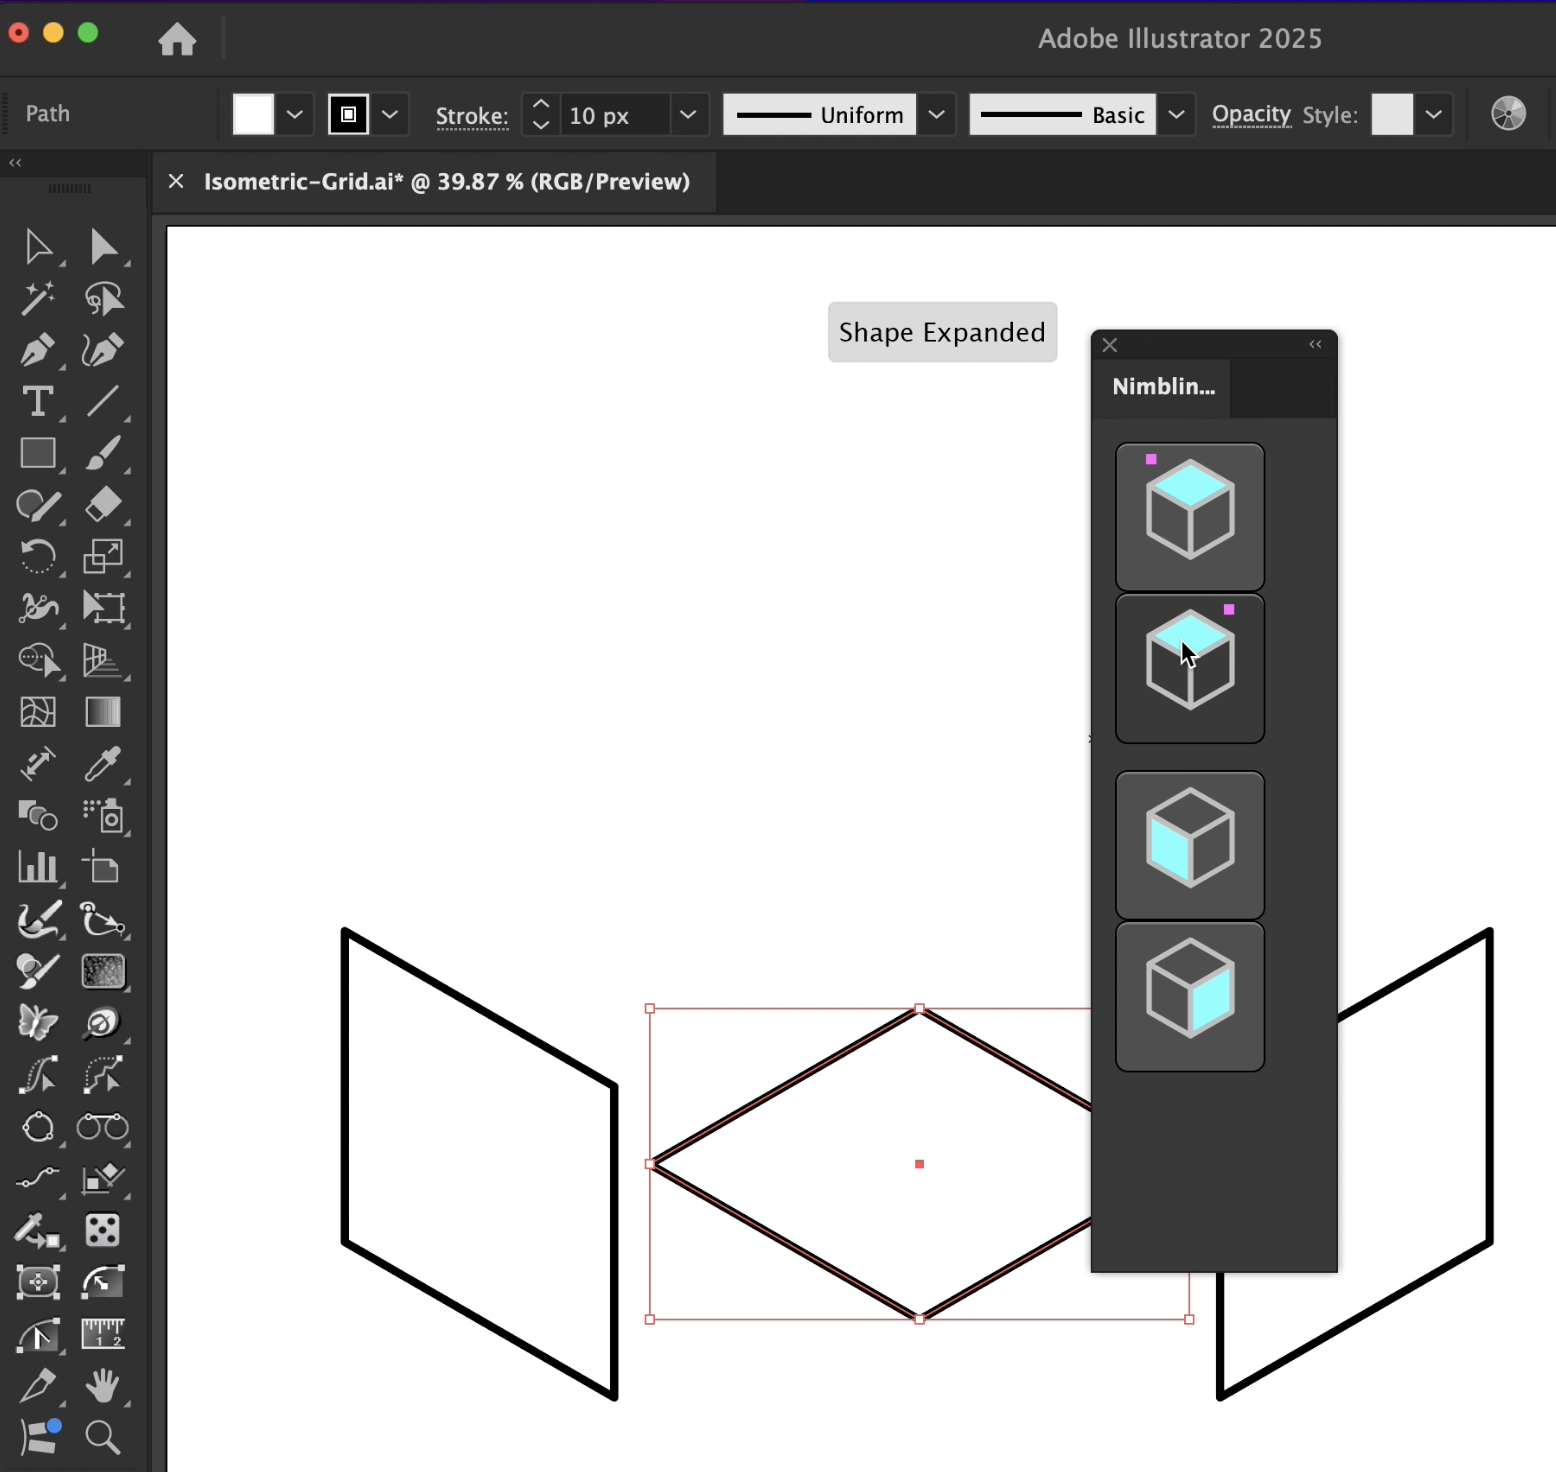
Once you’ve installed the Nimbling SSR extension from the Creative Cloud, you can find it in your Illustrator by navigating up to Window > Extensions > Nimbling 30 SSR.
The panel has 3 buttons which perform the actions of converting your shapes to be a top, left and right axonometric projection.
Adobe Illustrator’s native 3D and Materials panel (Window > 3D and Materials) also gives you options to transform an object into an Isometric preset as a live Effect. Live Effects are non-destructive, which means they can be hidden or removed easily without destroying the shape’s original geometry.

Tips and tricks for drawing in isometric perspective with Astute Graphics Plugins
Astute Graphics has hundreds of tools and functions for Adobe Illustrator that can speed up your workflow. We wanted to cover a few of the tips and tricks we like to use when working in isometrics.
If you want to try Astute Graphics for free, no card details required just an email address, then register today for a 7 day free trial.
Orient Transform Tool
At the beginning of this tutorial, we used the Orient Transform tool to create our isometric grid. But as this tool is perfect for copying and replicating your shapes across your artboard, and has the power to precisely snap to points and other objects, you can quickly build up anything in Adobe Illustrator whilst snapping to your Isometric grid.

DirectPrefs Angles and Guides
Previously, we also covered the DirectPrefs panel and how you can personalize the panel to have quick access to all the angles you need when working in an isometric perspective.
The panel is free — all you need to do is sign up for an Astute Graphics account. You’ll have access as long as you keep the account. You can find out more about that here: How do I get the Free Plugins?
Block Shadows
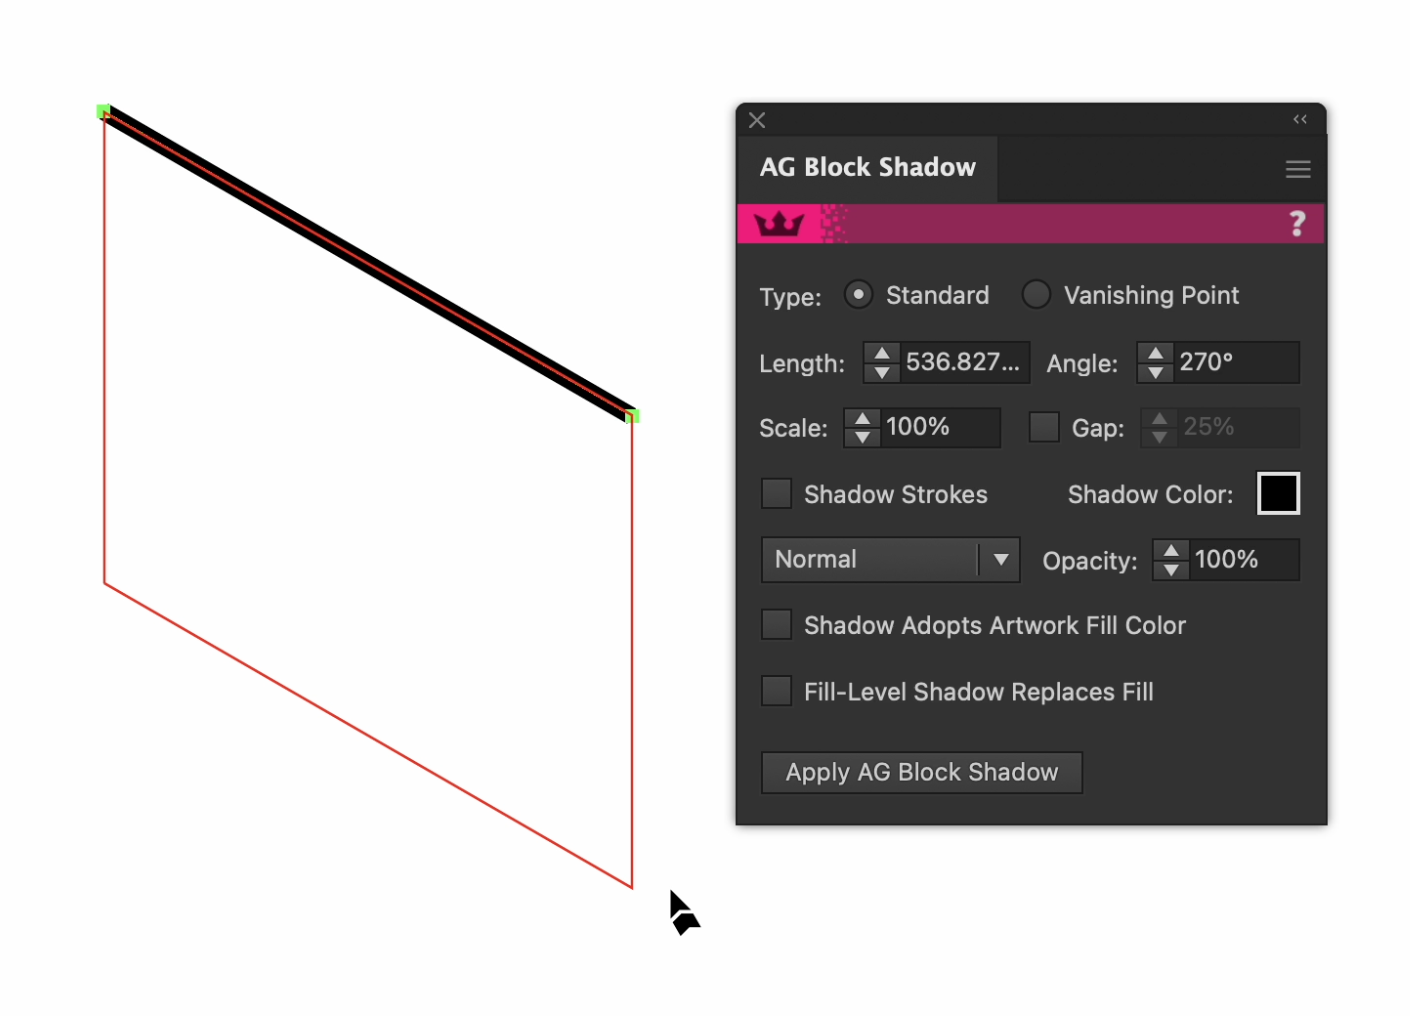
AG Block Shadow is part of the Stylism Plugin and is a live effect in Adobe Illustrator that allows you to draw out long block shadows without any hassle or “steps” generated when approximating this using the native Transform method.
Using the AG Block Shadow tool with its associated panel, we can drag out a perfect block shadow holding the Shift key will constrain the angle. AG Block Shadow works on both open and closed paths.
This live effect will stay attached and editable to that object until you choose to vectorize it. To detach and vectorize the shadow, use the fly-out menu on the panel and Detach All Selected AG Block Shadows.
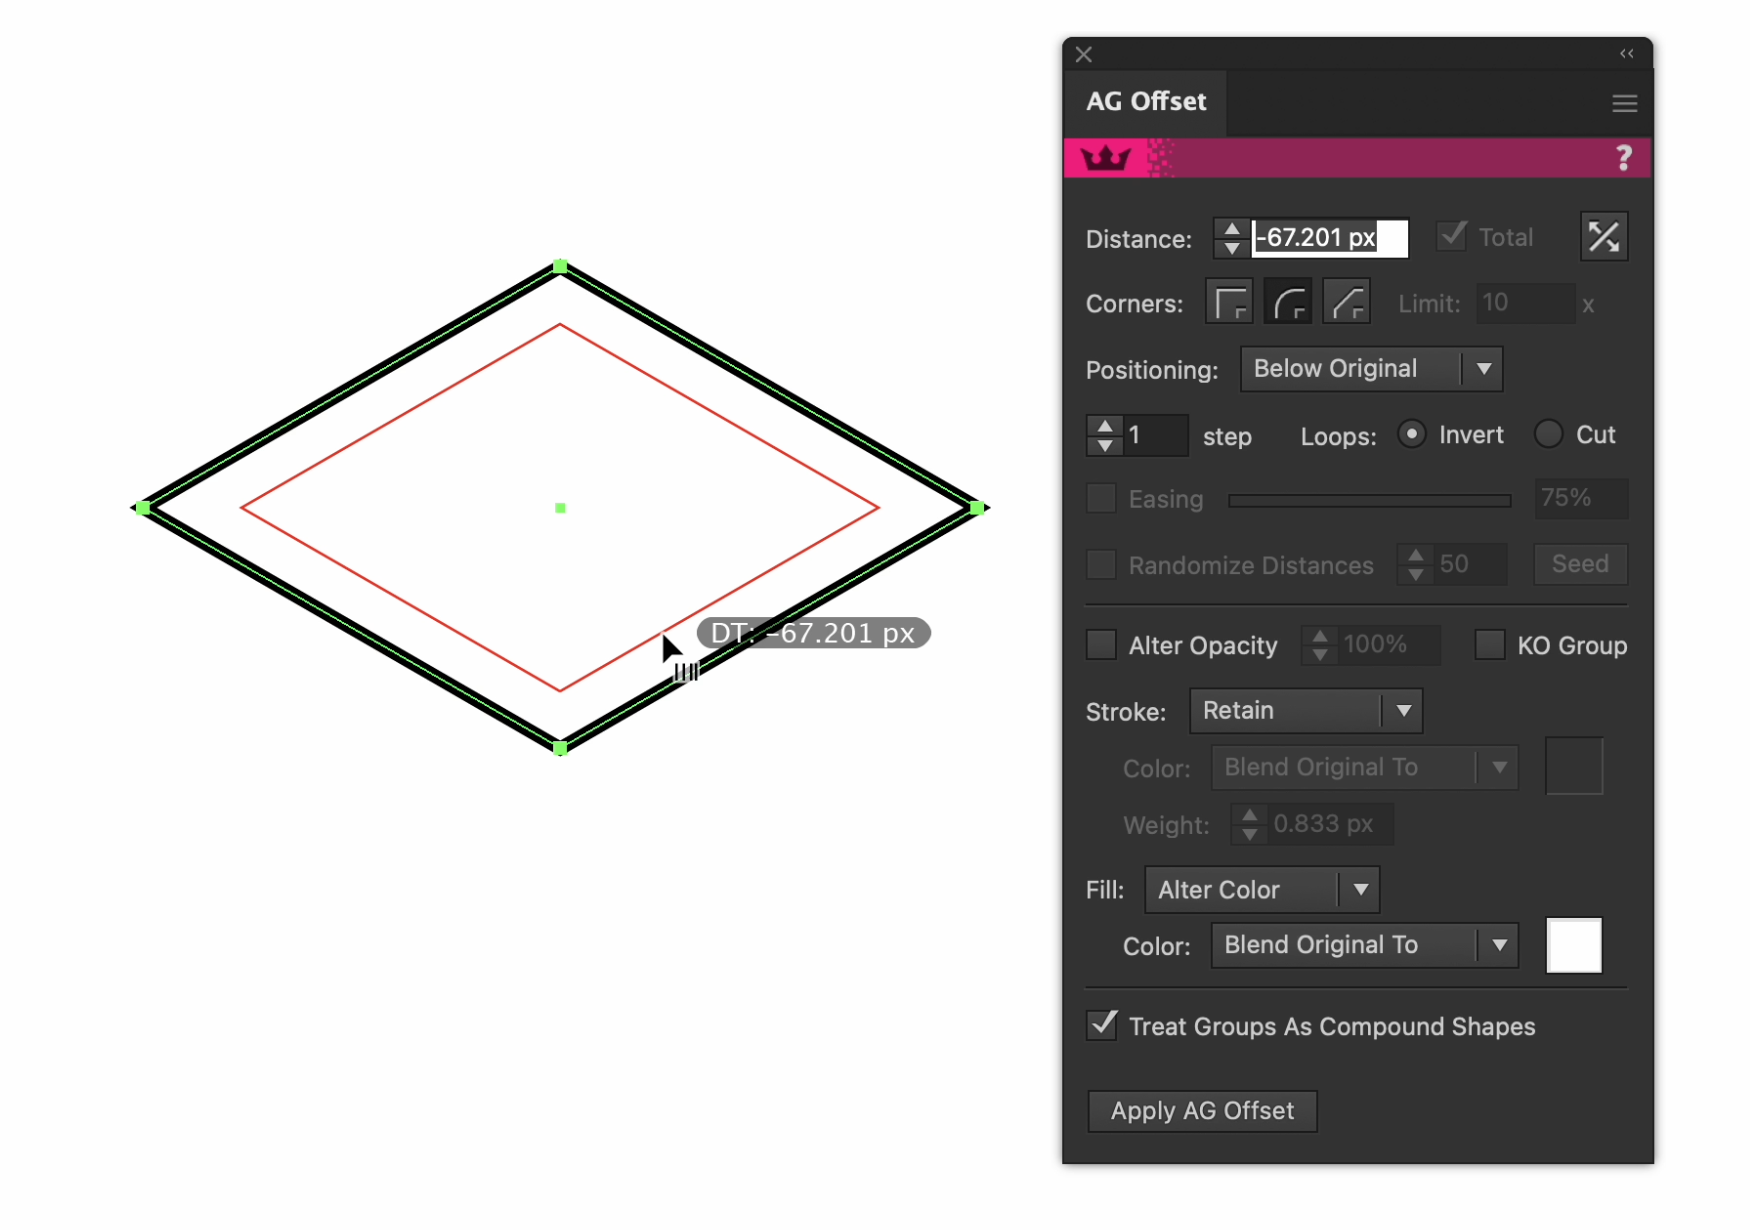
AG Offset
AG Offset is a Live Effect from Astute Graphics that can create multiple offsets on both closed and open paths in Adobe Illustrator. In our example, we’ve used AG Offset to create a compound shape that’s true to the isometric perspective. For example, to create the lip of the mug we can use the AG offset tool to accurately create a copy inside our original shape. It can be any distance you want, and you can also use the panel to enter an exact value. This means there’s no guess work and you don’t have to confine yourself to the grid, or risk resizing the object and mishandling the proportions when scaled down.
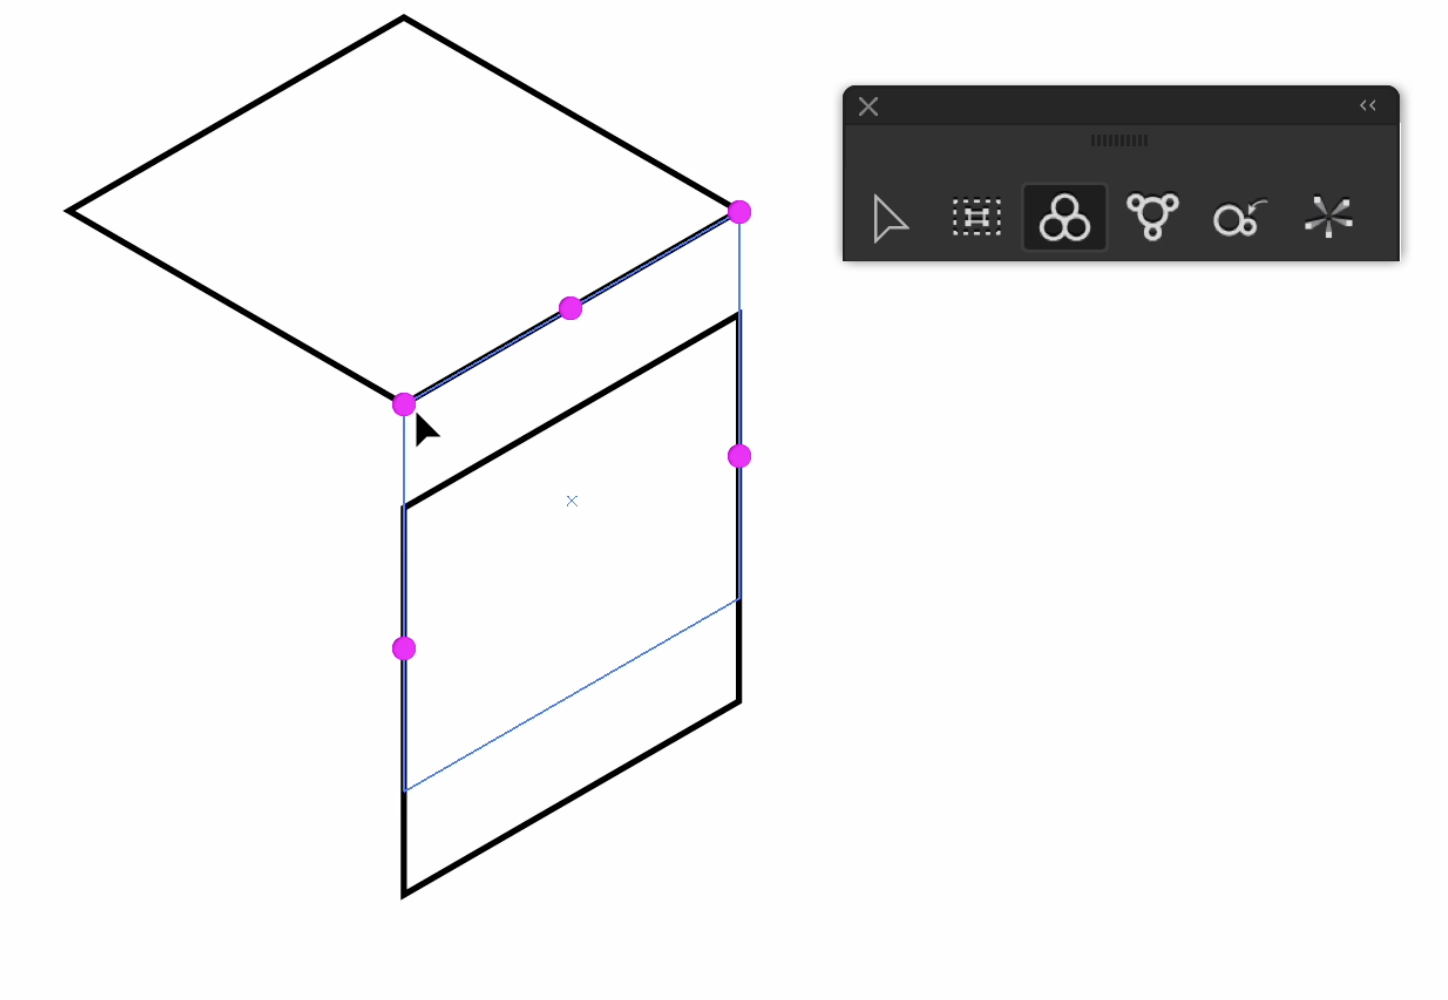
Snap to Collisions
Snapping objects in Adobe Illustrator can be extremely tricky and Smart Guides can be a help and a hindrance. The Snap to Collisions tool by Astute Graphics does exactly that. You can move and duplicate objects, and the tool will snap to existing objects. The tool also highlights the point at which it’s snapping, giving you higher control over moving objects.
There is no need for eyeball alignment in your work. Get greater precision and work smarter not harder with the Astute Graphics tool suite.
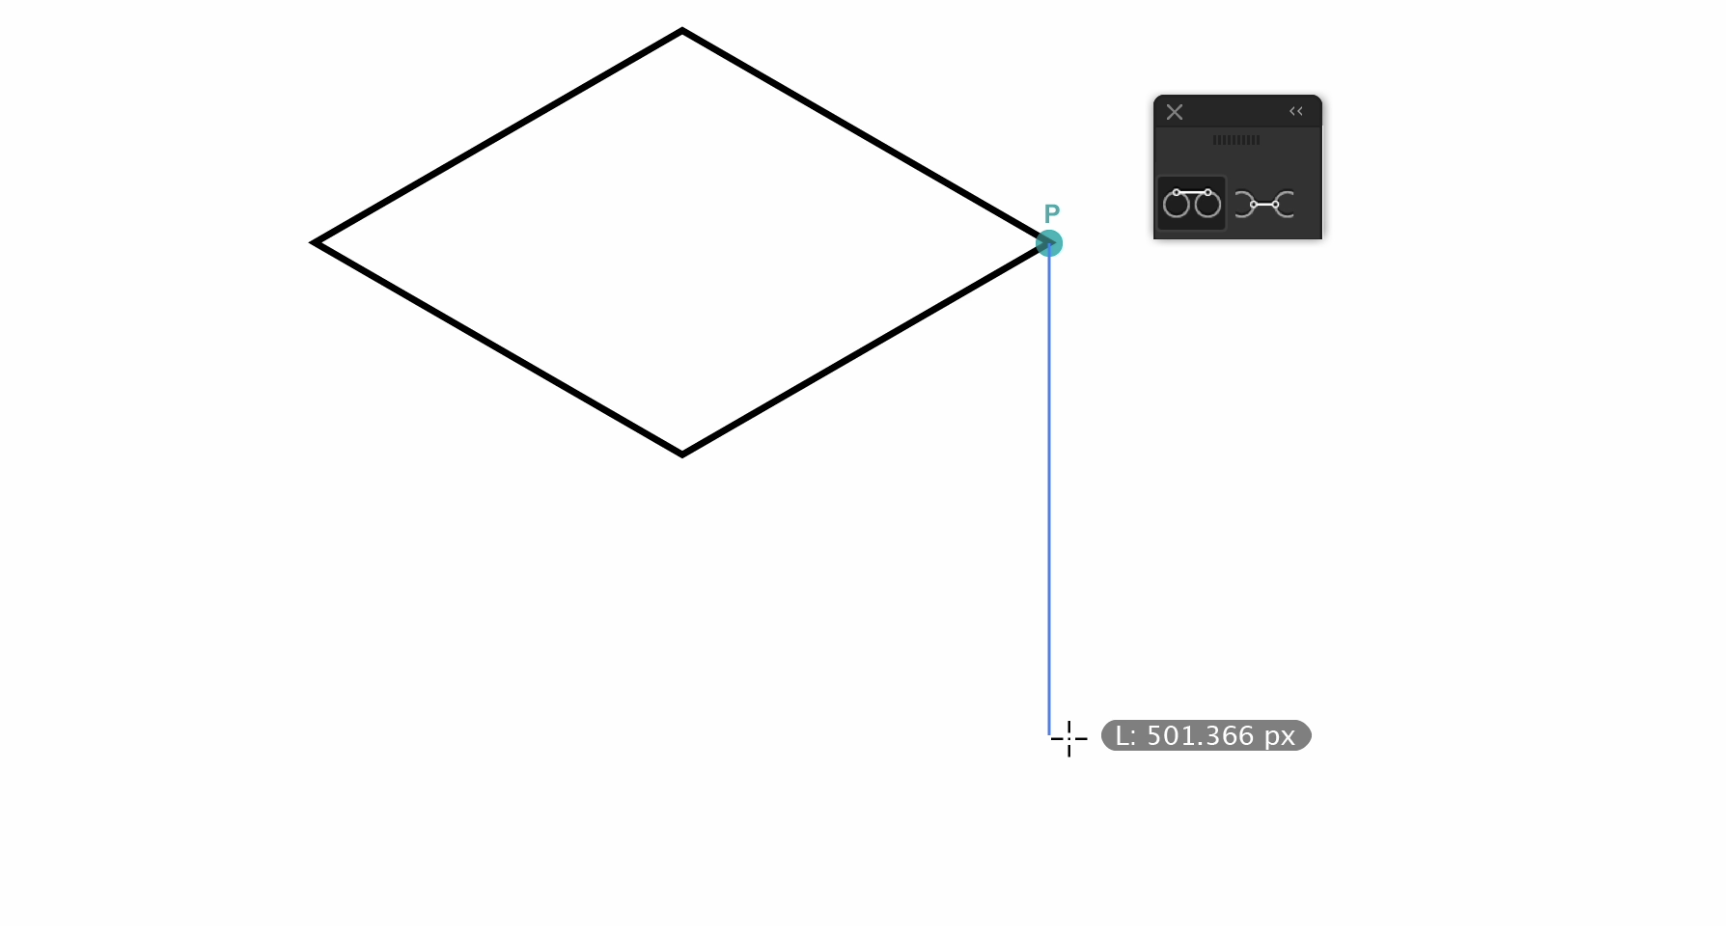
Tangent Line Tool
The Tangent Line tool is part of the Astute Graphics suite for Adobe Illustrator that creates straight paths that are tangent to one or two existing paths. Being able to draw out and snap to another object in Illustrator is not possible natively. You could make guesses, but why guess when there’s a tool for ultimate precision drawing?
Reform
The Reform Tool and Panel from Astute Graphics allows you to sculpt and manipulate shapes in Illustrator without having to adjust the bezier handles. Another excellent feature of the Reform plugin is that you can constantly offset sections of your shape, and with the smart join option enabled you can extend or reduce your shape without the need to move the individual anchor points.
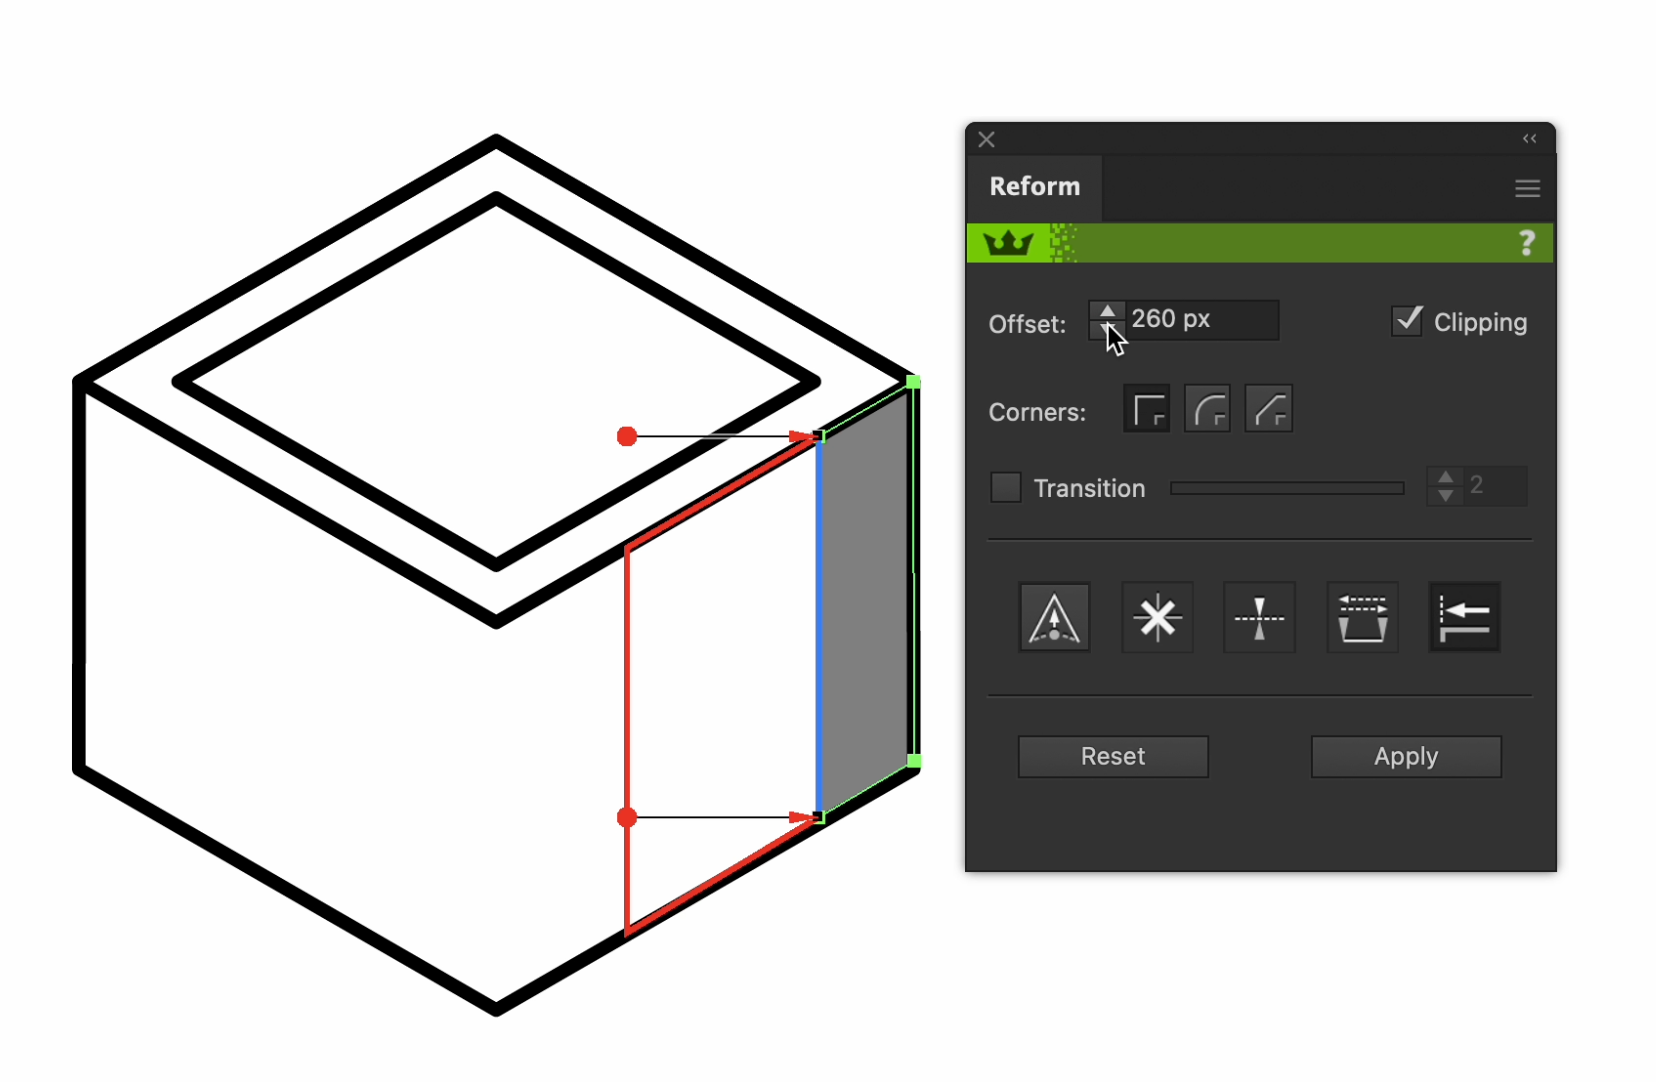
For example, if I wanted to create a shadow, rather than trying to guestimate a rectangle and then transform it to be isometric, we can duplicate the original and use the Constant Offset option of Reform (Alt/Option + Shift) to reduce it down. The Smart Join option, which can be enabled in the panel, will accurately continue or decrease a shape according to the geometry and angles to the original.

