Draw with ink simulations in Adobe Illustrator
2 minute readThe InkFlow plugin allows you to create realistic ink simulation effects which can be added to your strokes in Illustrator. It's perfect for drawing, sketching and writing, using its pressure, tilt and bearing stylus controls. Or you can use the easy to access realistic Ballpoint Pen, Brush Pen, Calligraphic Pen and Marker presets, then tweak all settings to suit your style and save your favourites as presets.
Try InkFlow free for 7 days with the Astute Graphics Free Trial (no card details required).
How to get started with InkFlow:
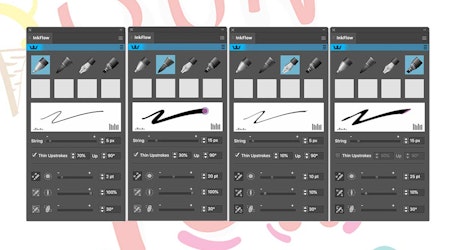
Open the Inkflow Panel (Window > Astute Graphics > InkFlow).
Choose your default pen type from the panel (ball point, brush pen, calligraphic pen or marker).
Use your mouse or stylus device to start doodling.
Use the panel to tweak the settings and adjust the pens size, roundness and angle.
Save your settings by Alt/Option-clicking inside a User Defined Box to save for later.
Use the 3 bar flyout menu to Show Ink Simulation Controls, so that you can add feathering, splatter or bleed to your pen strokes.
If you want to override your personalised saved preset, simply Alt/Option-click on the window again to update with all the new panel settings.


